
Set up your Tai integration
Connect Tai to Cargado in about 15 minutes: create a staff user, an authentication key and two custom reports in Tai, then send Cargado four items.
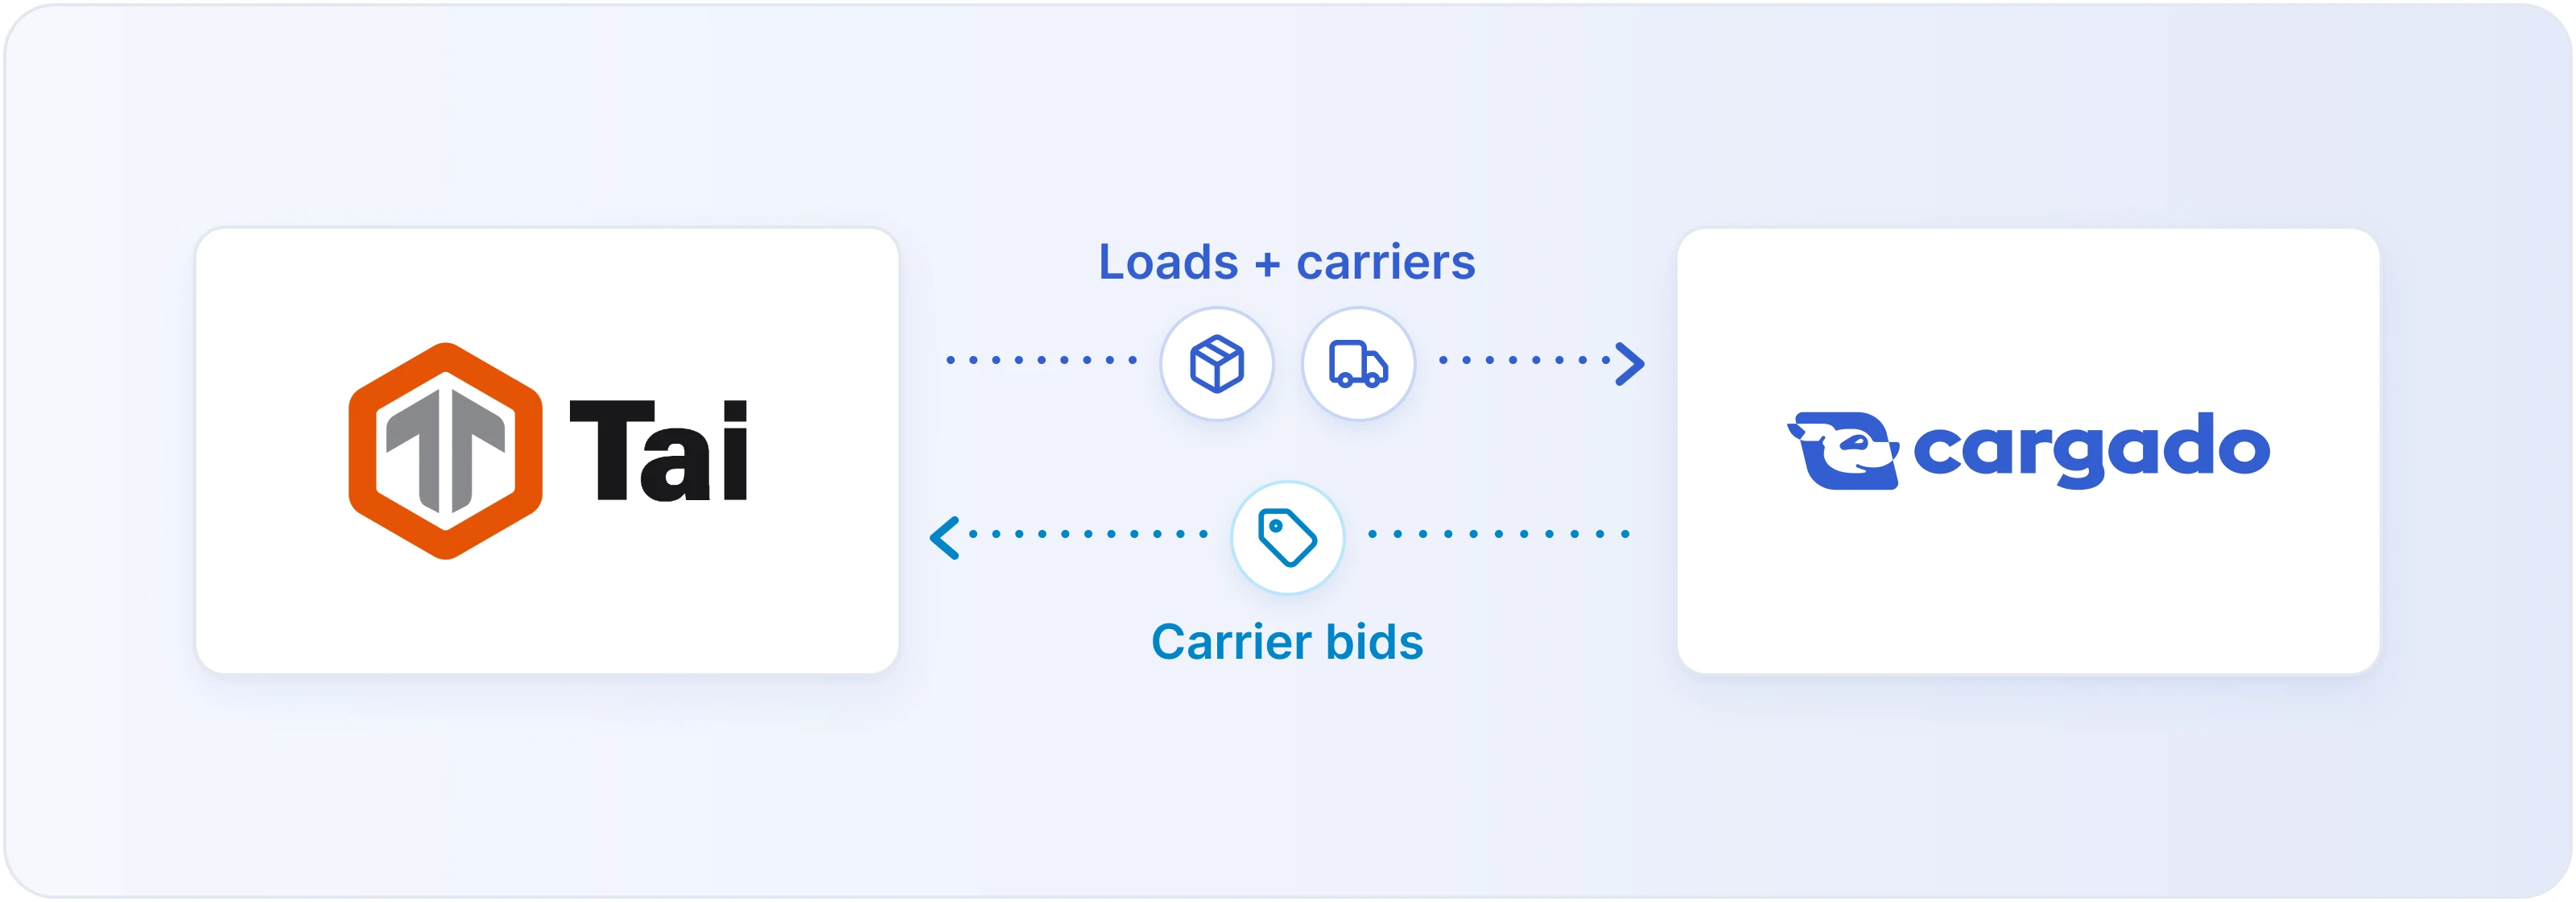
Once Tai is connected, your loads sync into Cargado, your carrier list and statuses stay in step, and carrier bids come back into Tai. Most teams do setup on a short screen-share call with their Cargado contact, who fills in the Cargado side while you work in Tai.
The integration is free. Cargado builds, hosts and supports it.
Before you start
You need:
- A Tai login with admin rights. You'll create a staff user, an authentication key and two custom reports.
- Your Tai login URL, the web address you use to sign in to Tai (for example,
https://yourcompany.taicloud.net). - The login email Cargado sends you for the Cargado staff user. Use that exact email. Don't create a new mailbox for it.
The setup call goes fastest with someone who knows your Tai setup and can approve posting rules.
You'll send Cargado four things at the end:
- Your Tai login URL
- The public authentication key
- The report code for the shipment report
- The report code for the carrier report
Send keys and report codes straight to your Cargado contact. Don't post them in shared chats or channels.
Step 1: Create the Cargado API staff user
Everything the integration does in Tai is recorded under this user, so you can always see what came from Cargado.
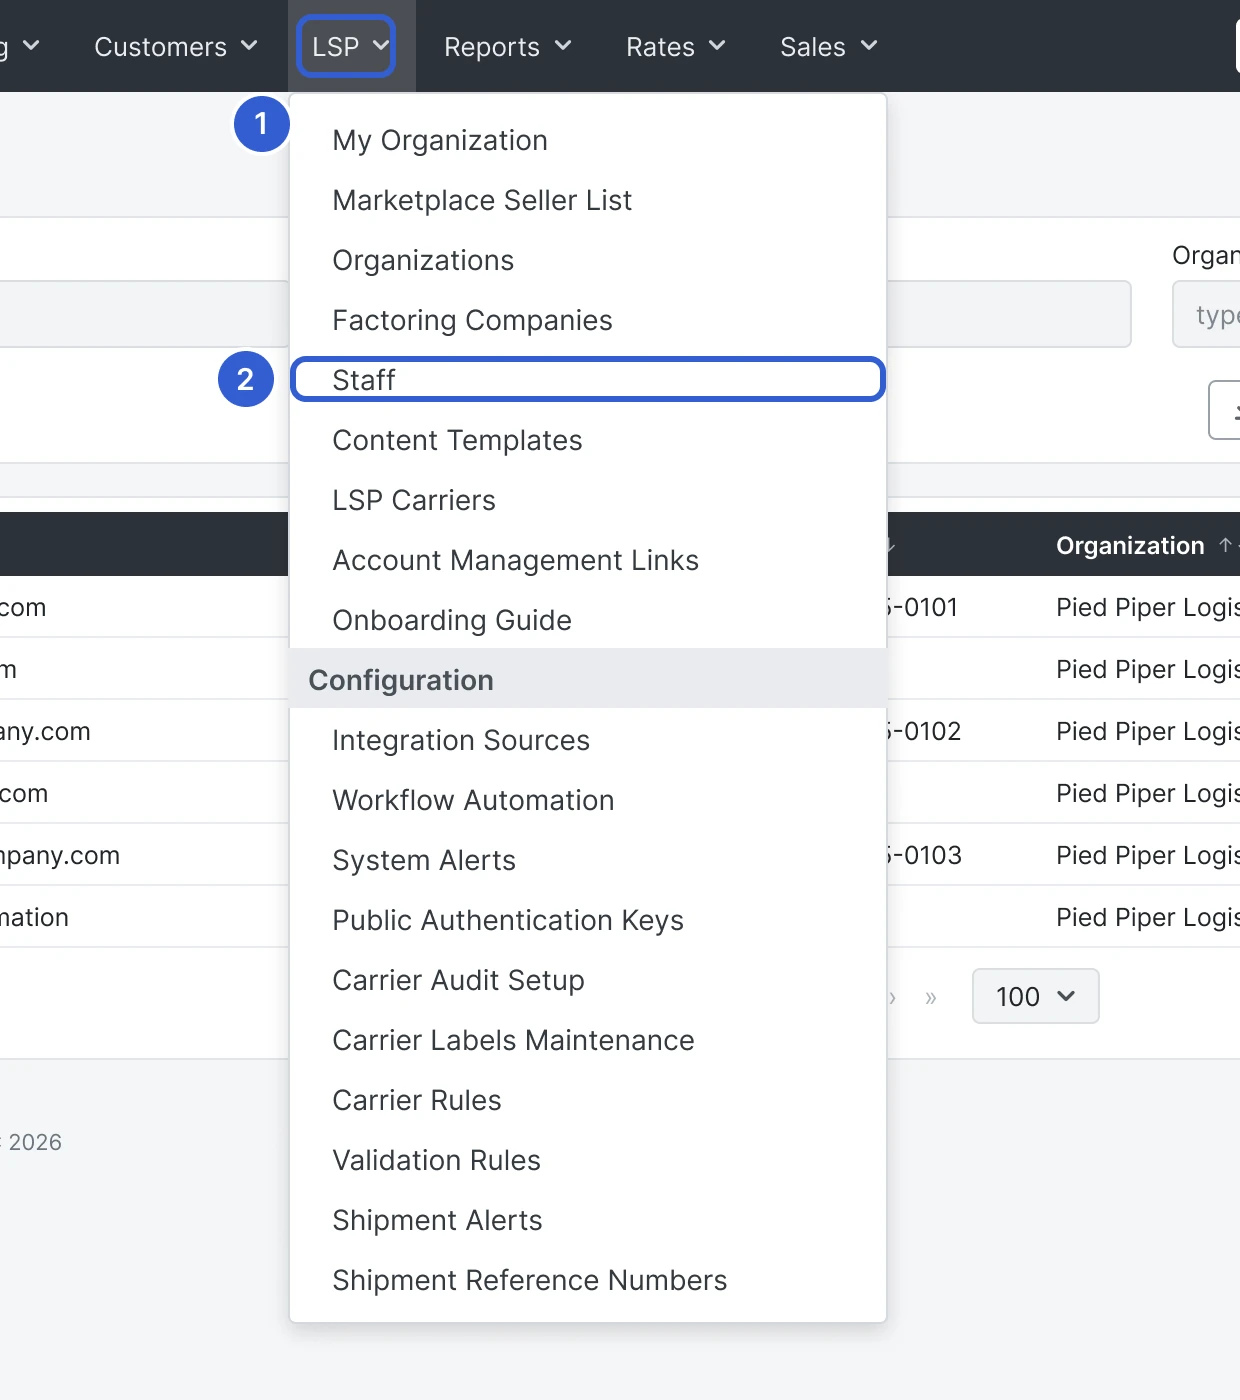
- In Tai, open the LSP menu and choose Staff.
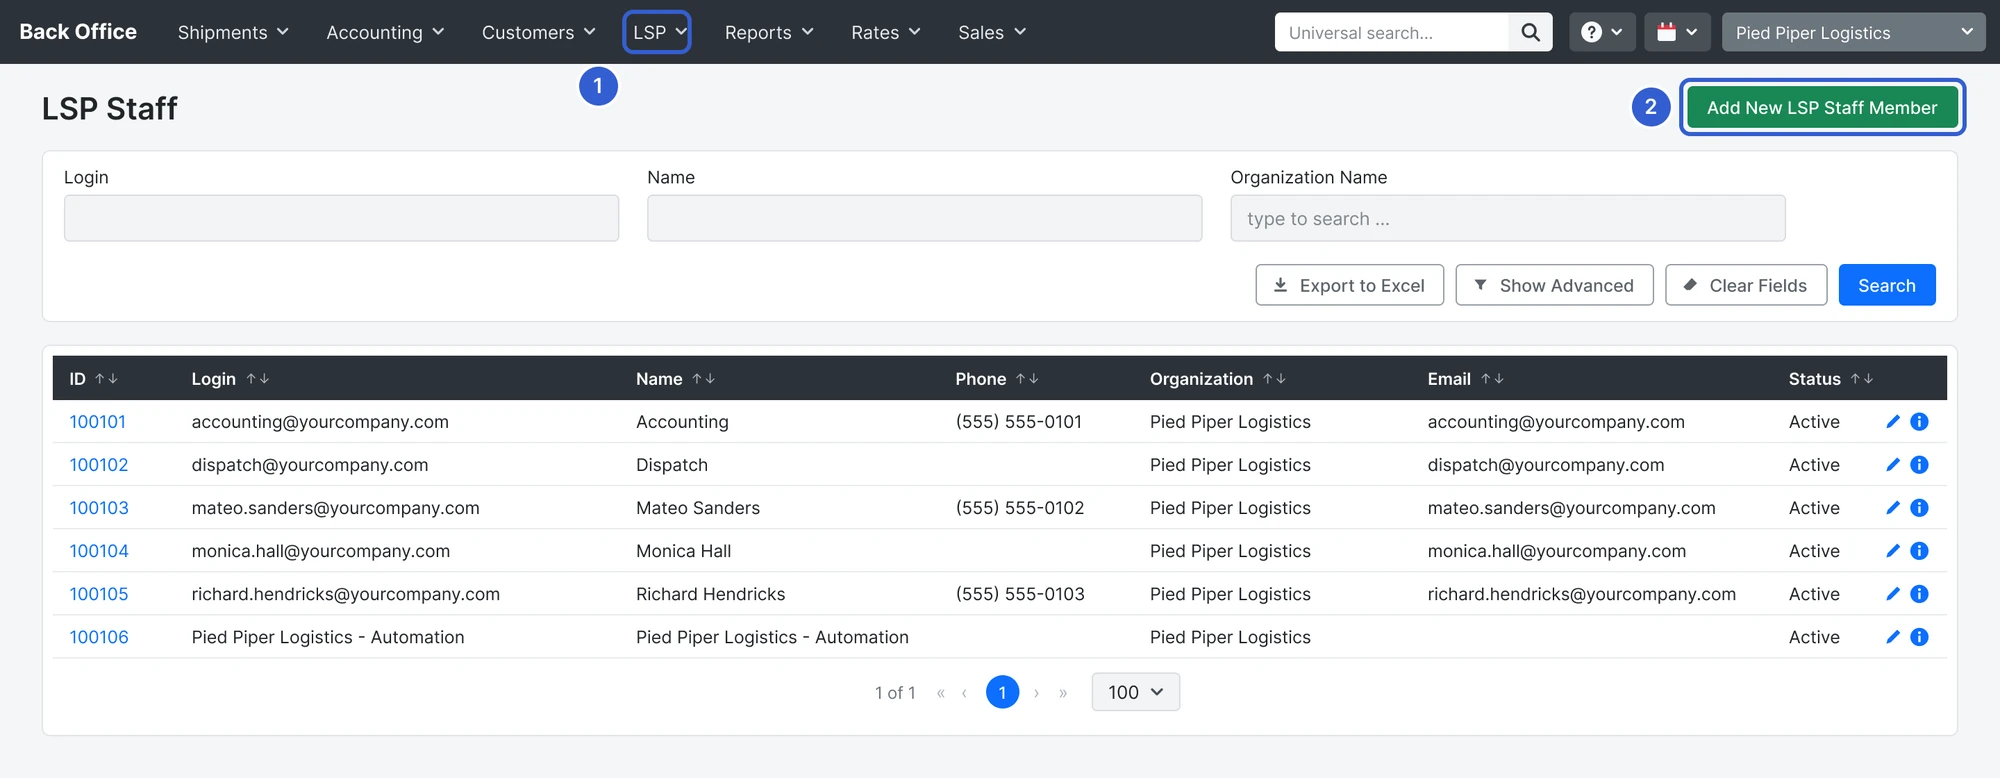
- On the staff list, click Add New LSP Staff Member (top right).
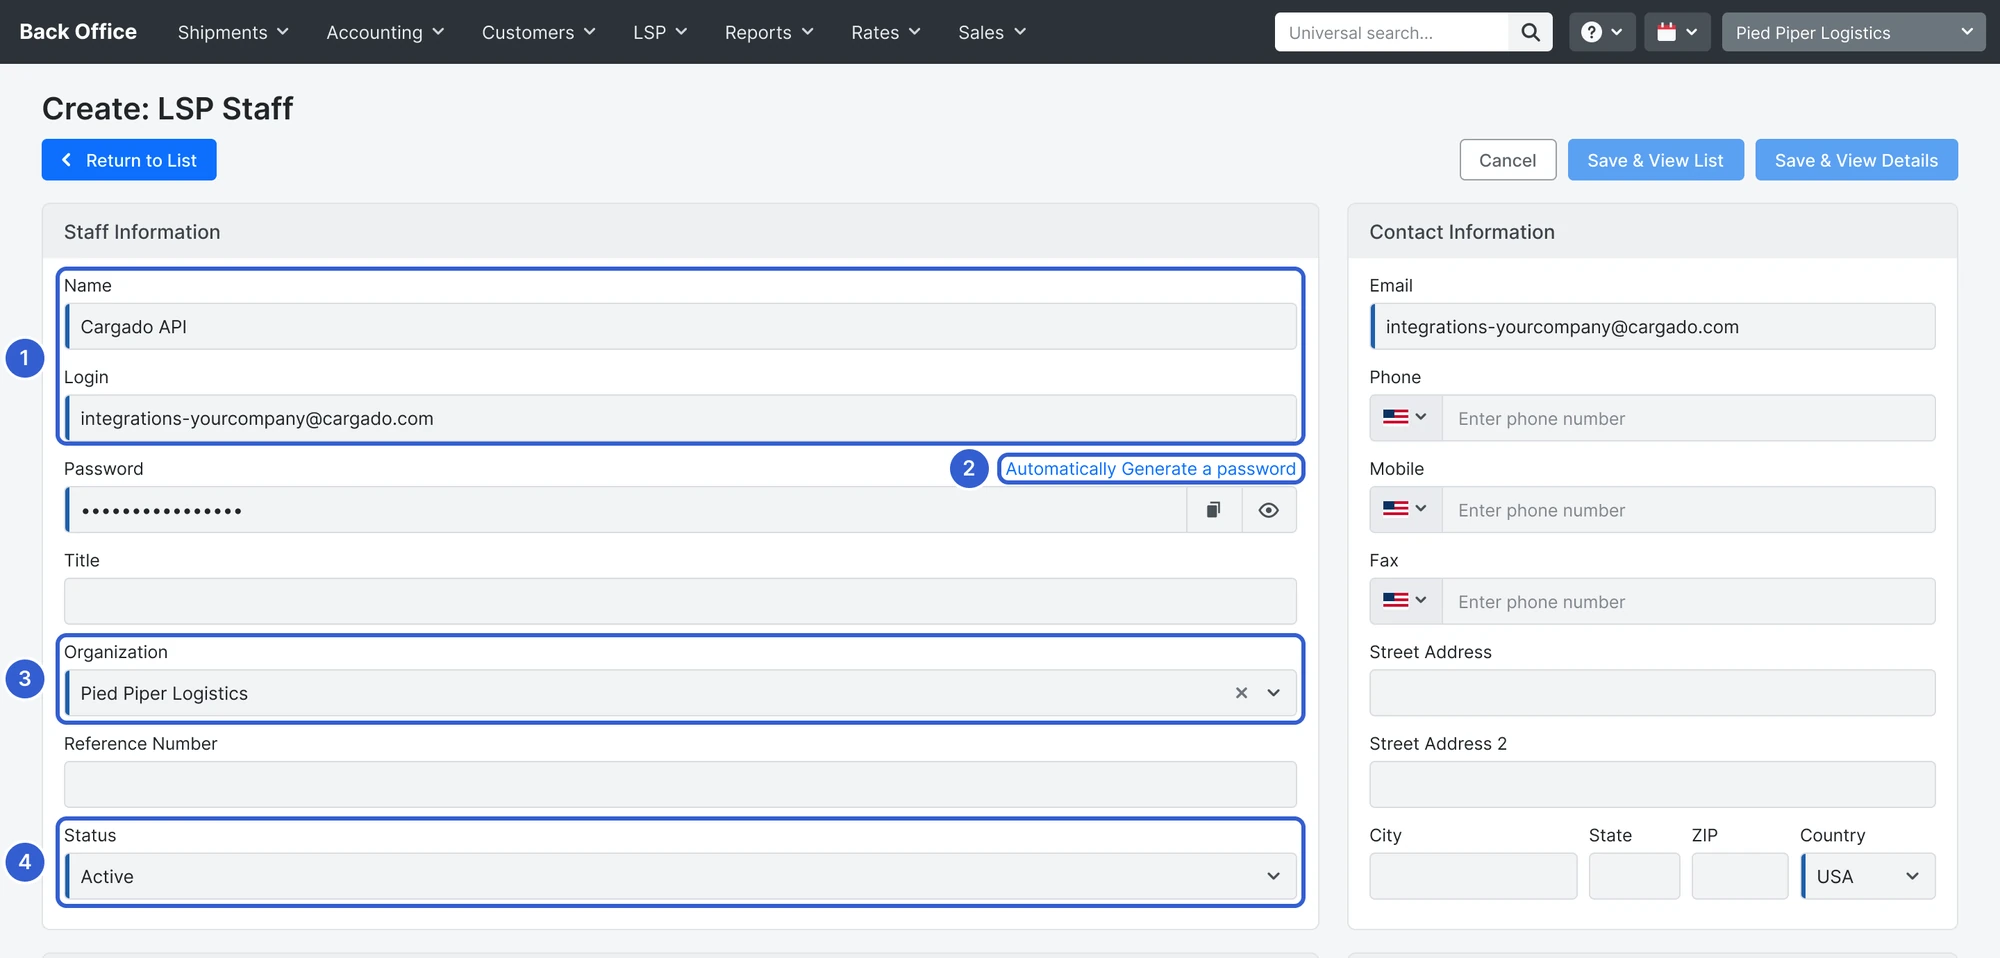
- Under Staff Information, fill in:
- Name:
Cargado API - Login: the email Cargado sent you
- Password: click Automatically Generate a password. Nobody signs in with this password, so you don't need to save it.
- Organization: your brokerage (accounting) organization
- Status: Active
- Name:
- Under Permissions, check these six boxes:
- Batch Processing
- LSP Carrier Add/Edit
- LSP Carrier Details
- Master Carrier Add/Edit
- Truckload Quoting Tools
- User Allowed Org Access
Leave every other box unchecked. Tai checks Reports - Basic and Reports - Sales by default; uncheck them.
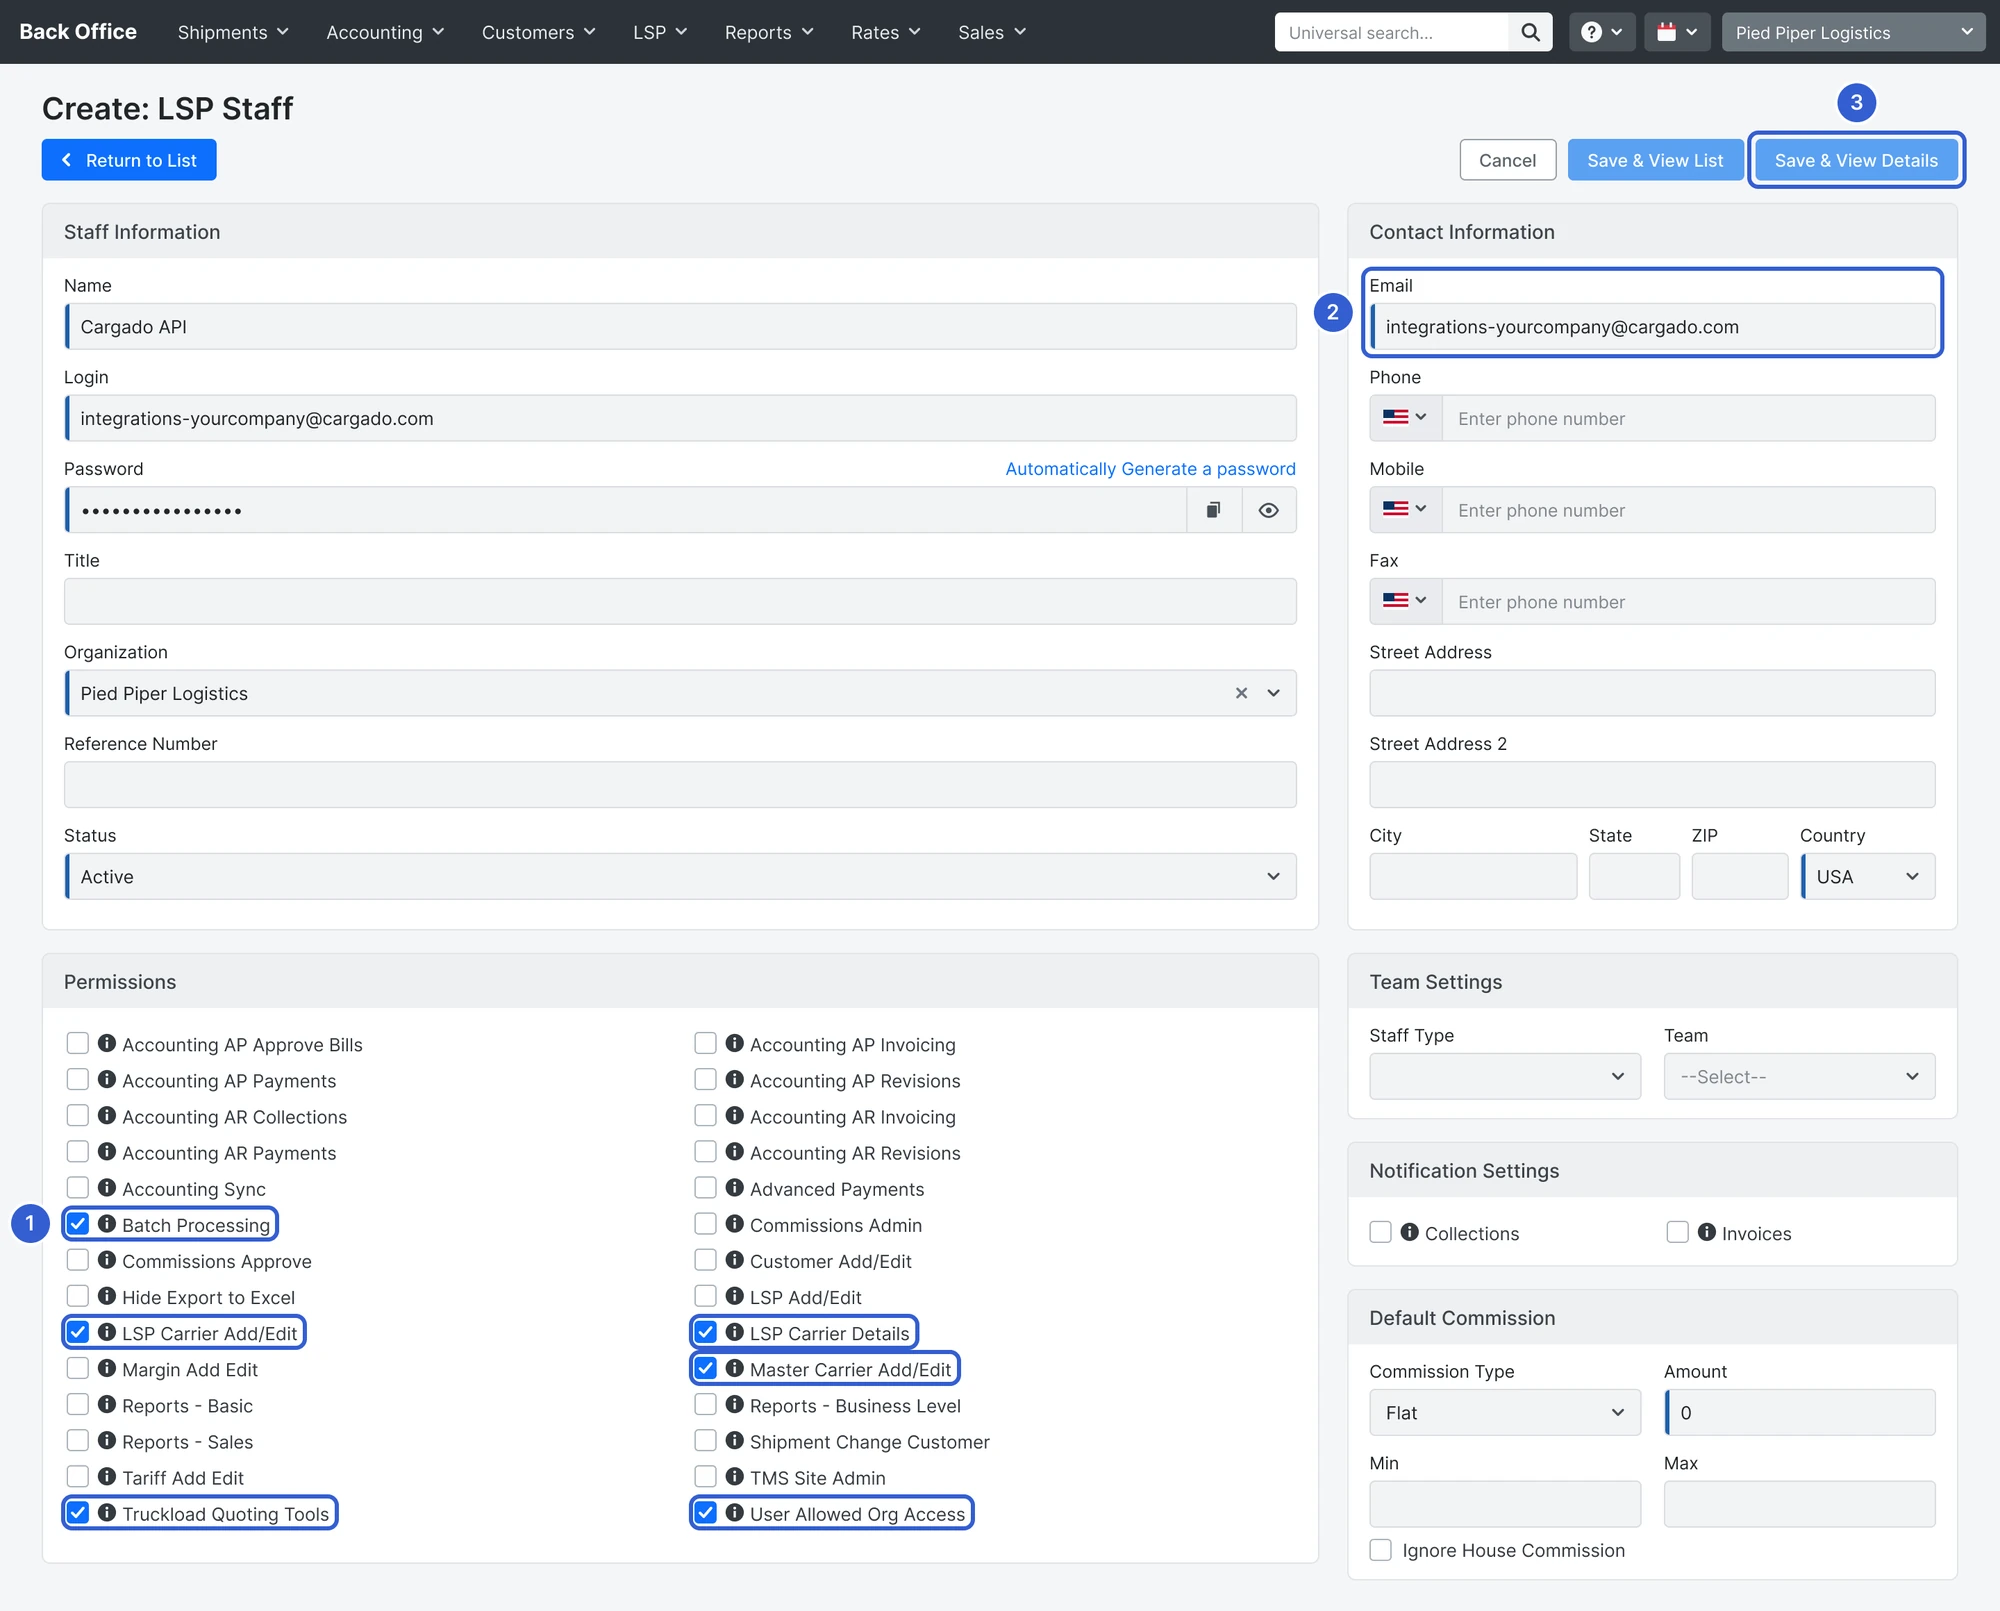
- Under Contact Information, enter the same email in Email. Tai asks for it a second time here.
- Click Save & View Details.
Step 2: Create the public authentication key
Cargado uses this key to read loads and carriers and to send bids back, on behalf of the Cargado API user.
- Open the LSP menu. Under Configuration, choose Public Authentication Keys.
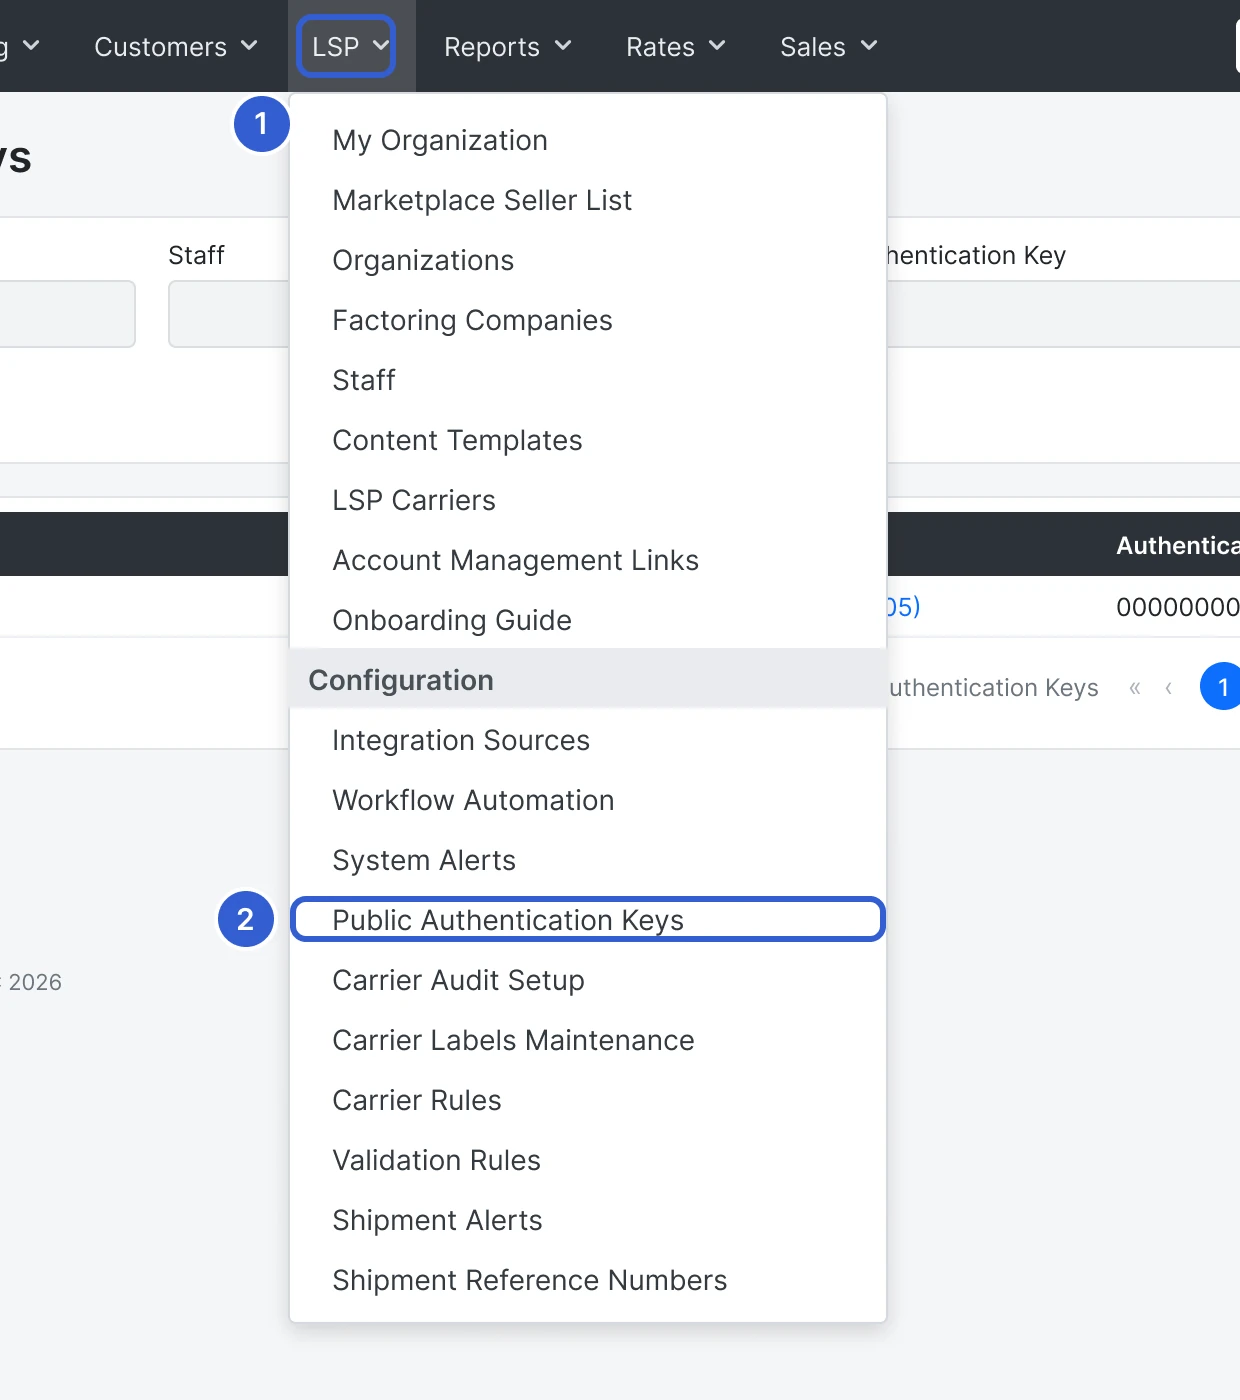
- Click Add Public Authentication Key. Tai fills in the key for you.
- In the form, set:
- Organization: your brokerage (accounting) organization
- Staff: Cargado API (the user from Step 1)
- Active: checked
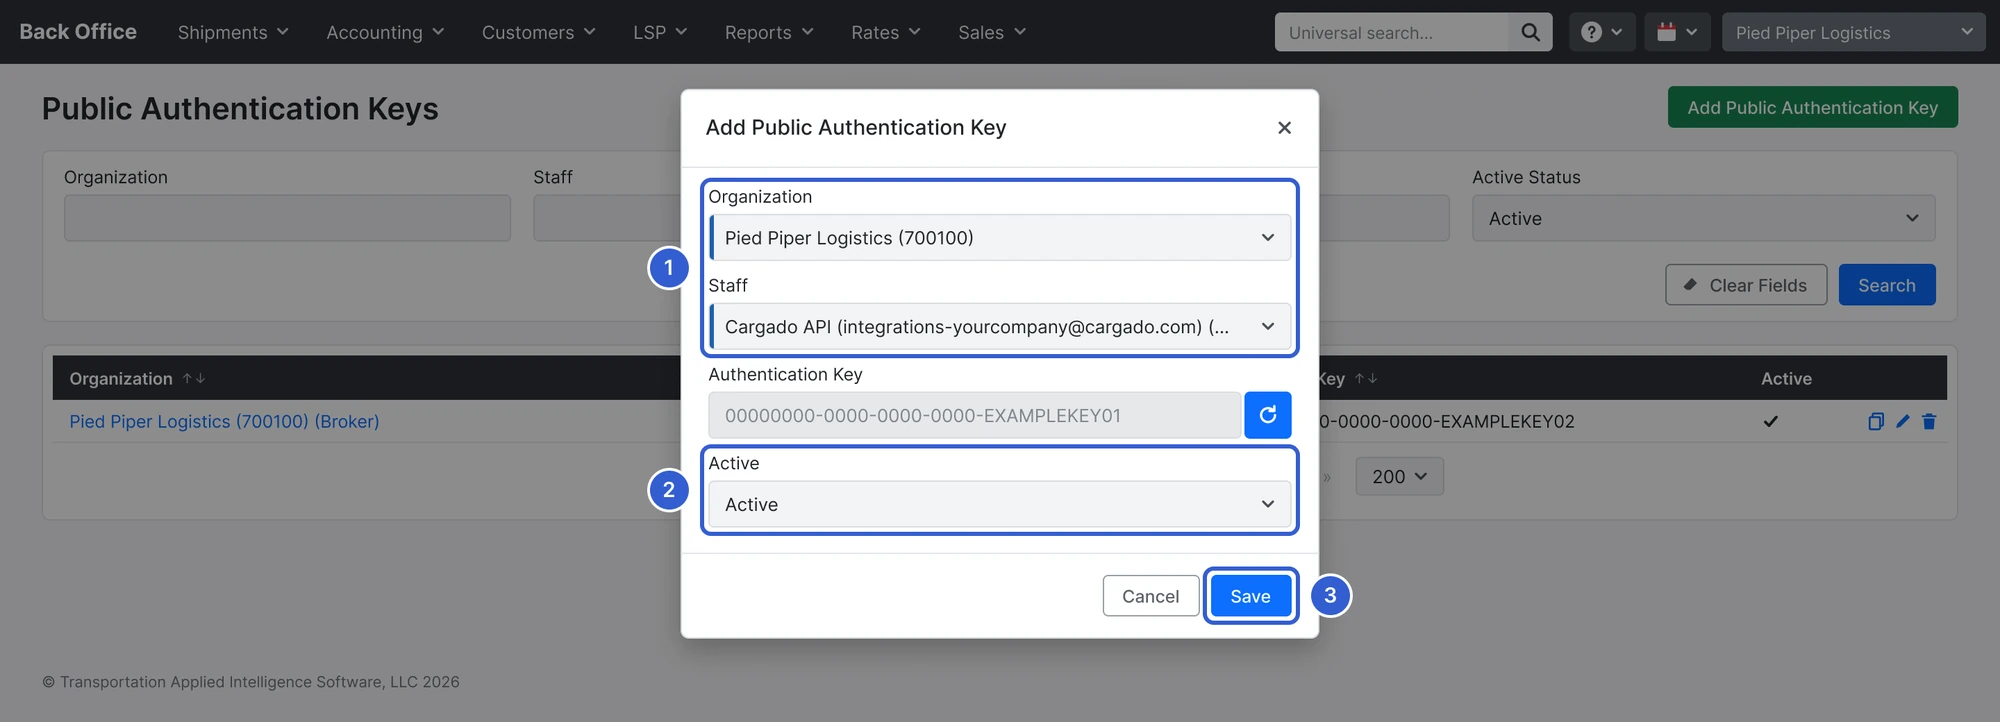
- Click Save.
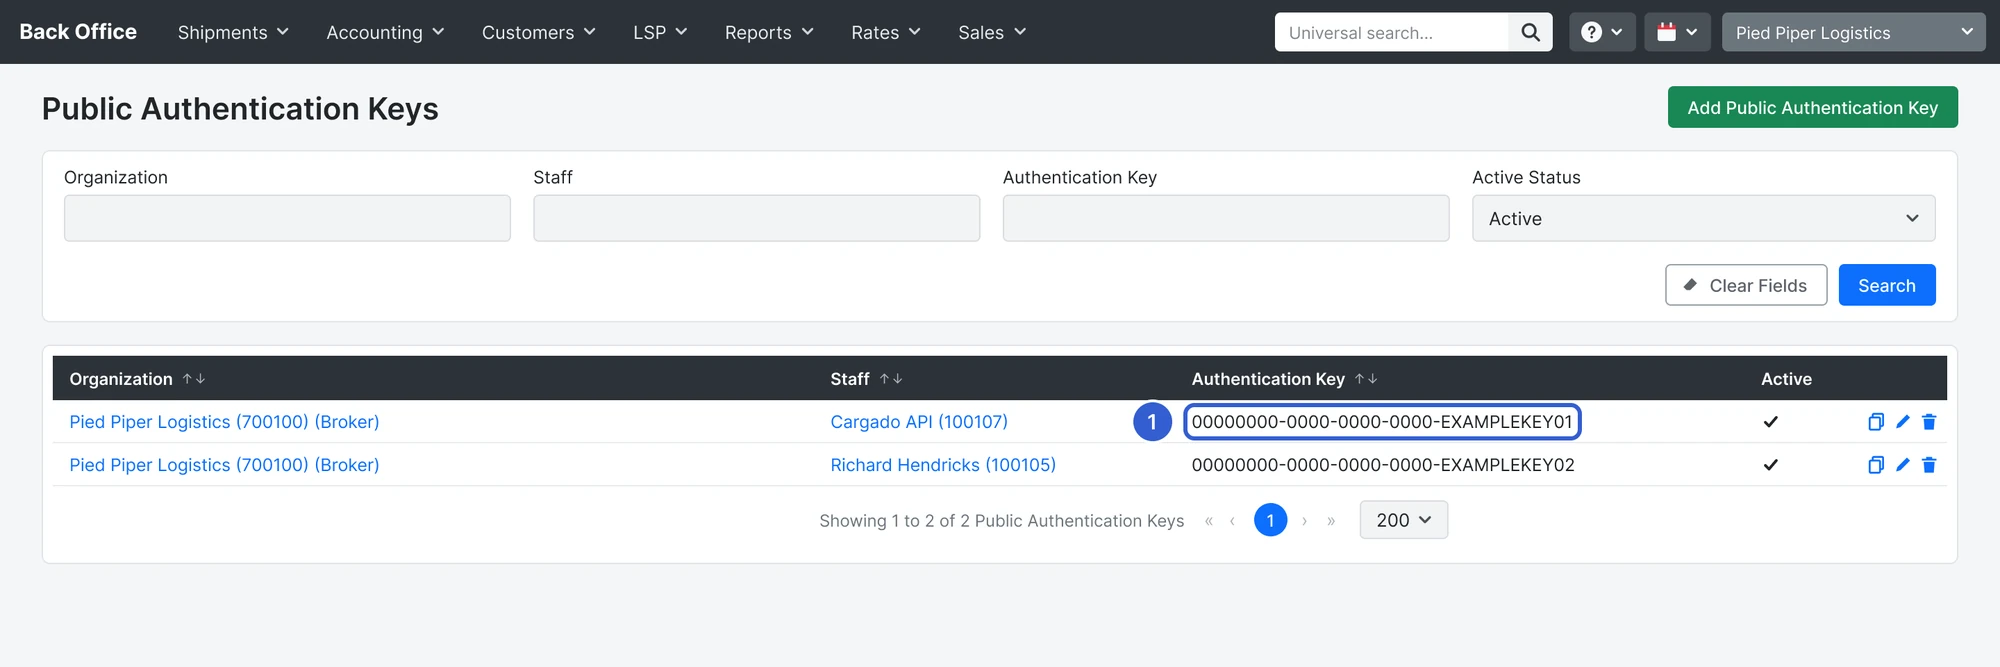
- In the key list, find the row for Cargado API and copy the value in the Authentication Key column. This is item 2 of the four you send Cargado.
Tai's own guide to API keys is here.
If an older key for Cargado is in the list, delete it with the trash icon on its row so there's only one.
Step 3: Create the shipment report
Tai doesn't offer an API for every list Cargado needs, so two custom reports give Cargado the IDs of your shipments and carriers. The reports grant no new access. Cargado uses them to load your history at the start and to catch anything a live update missed.
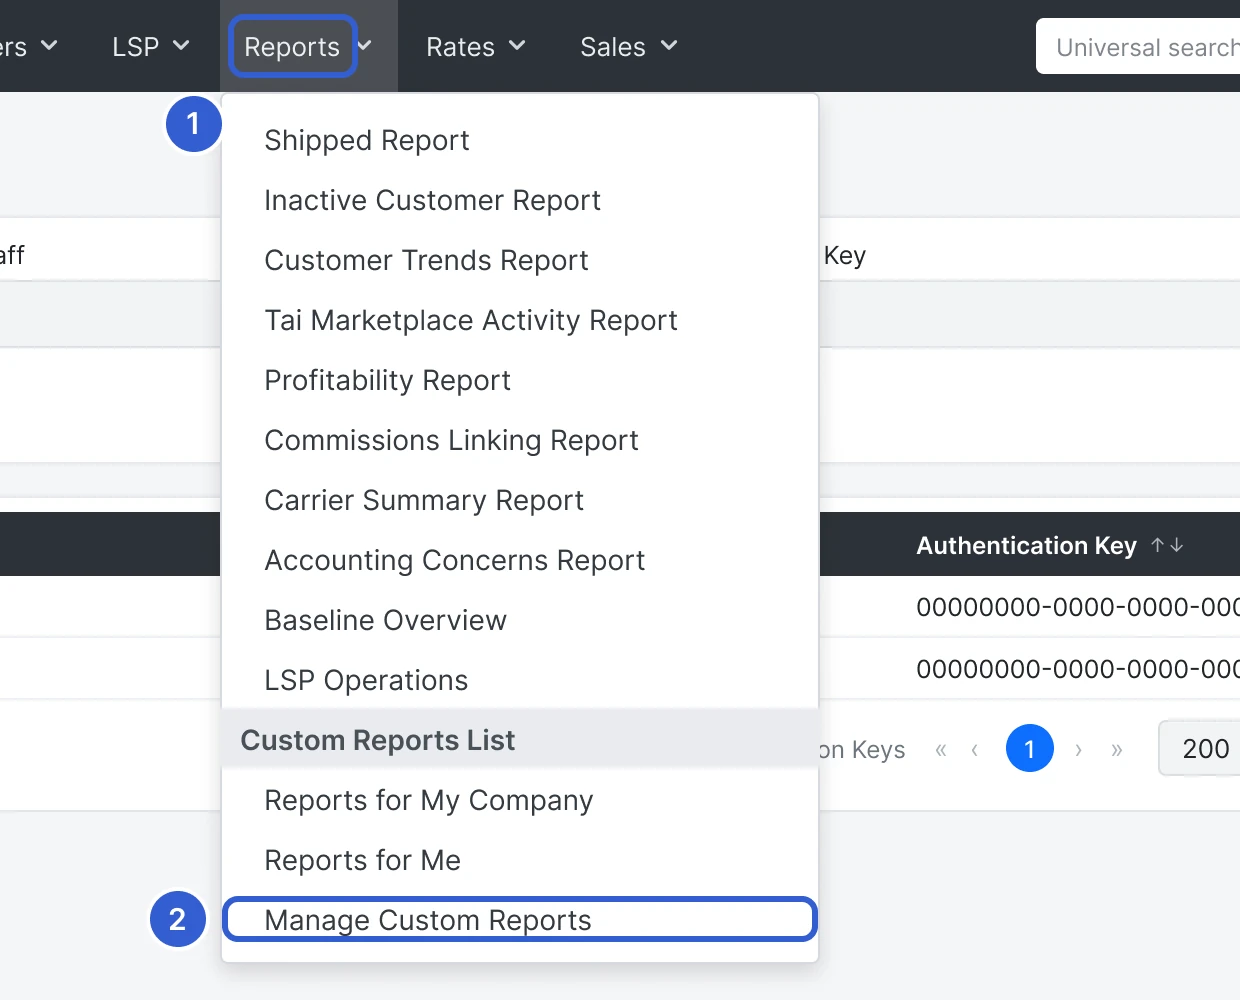
- Open the Reports menu and choose Manage Custom Reports.
- Click Add New Report (top right).
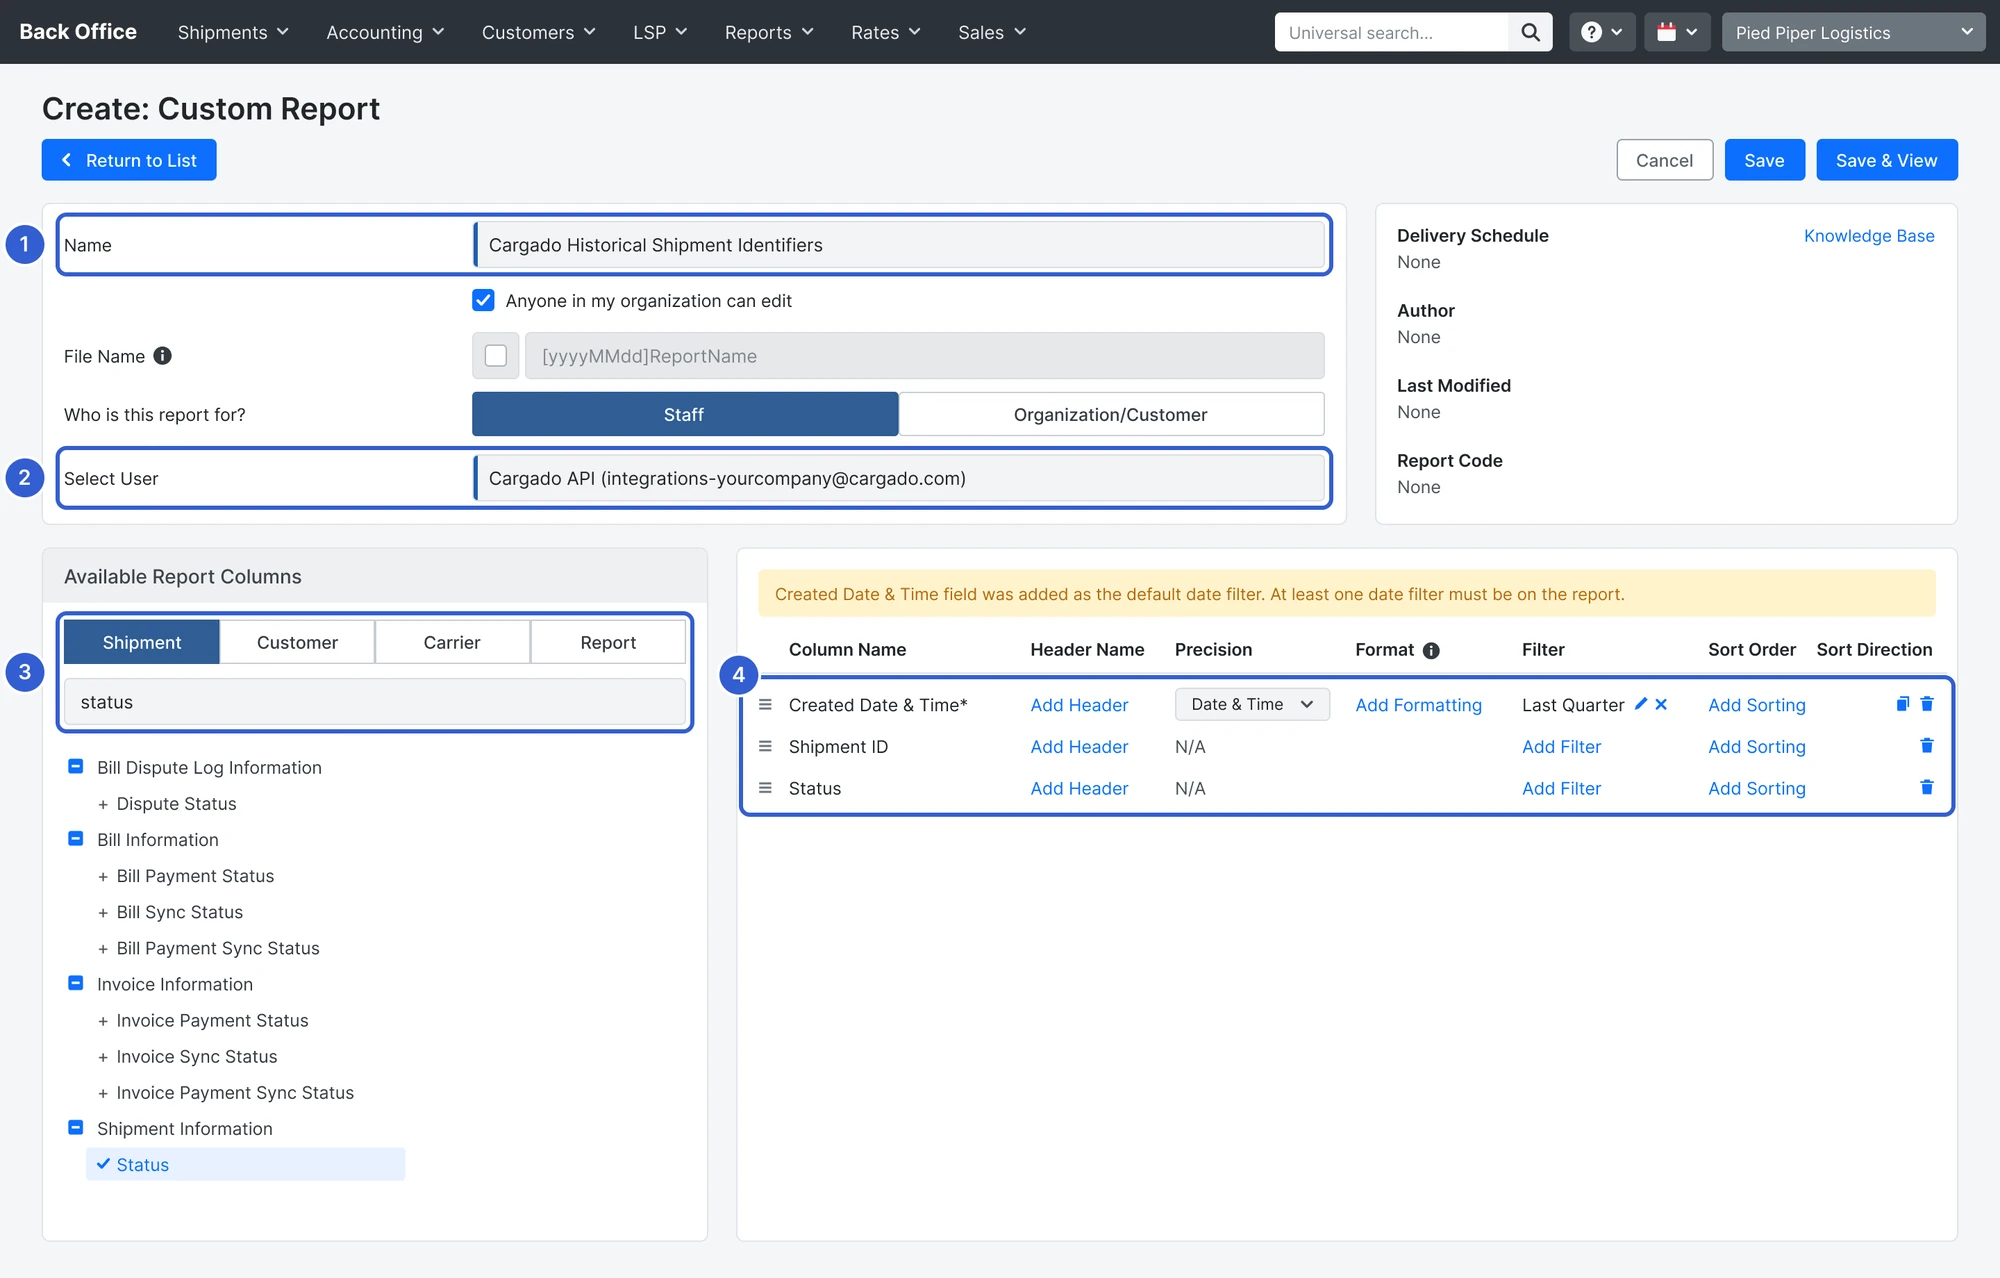
- Name:
Cargado Historical Shipment Identifiers - Select User: choose Cargado API.
- Stay on the Shipment tab. Use the search box on the left to add these columns:
- Shipment ID (search "shipment id")
- Shipment Information > Status (search "status")
Tai adds Created Date & Time for you, with its filter set to Last Quarter. Keep that column.
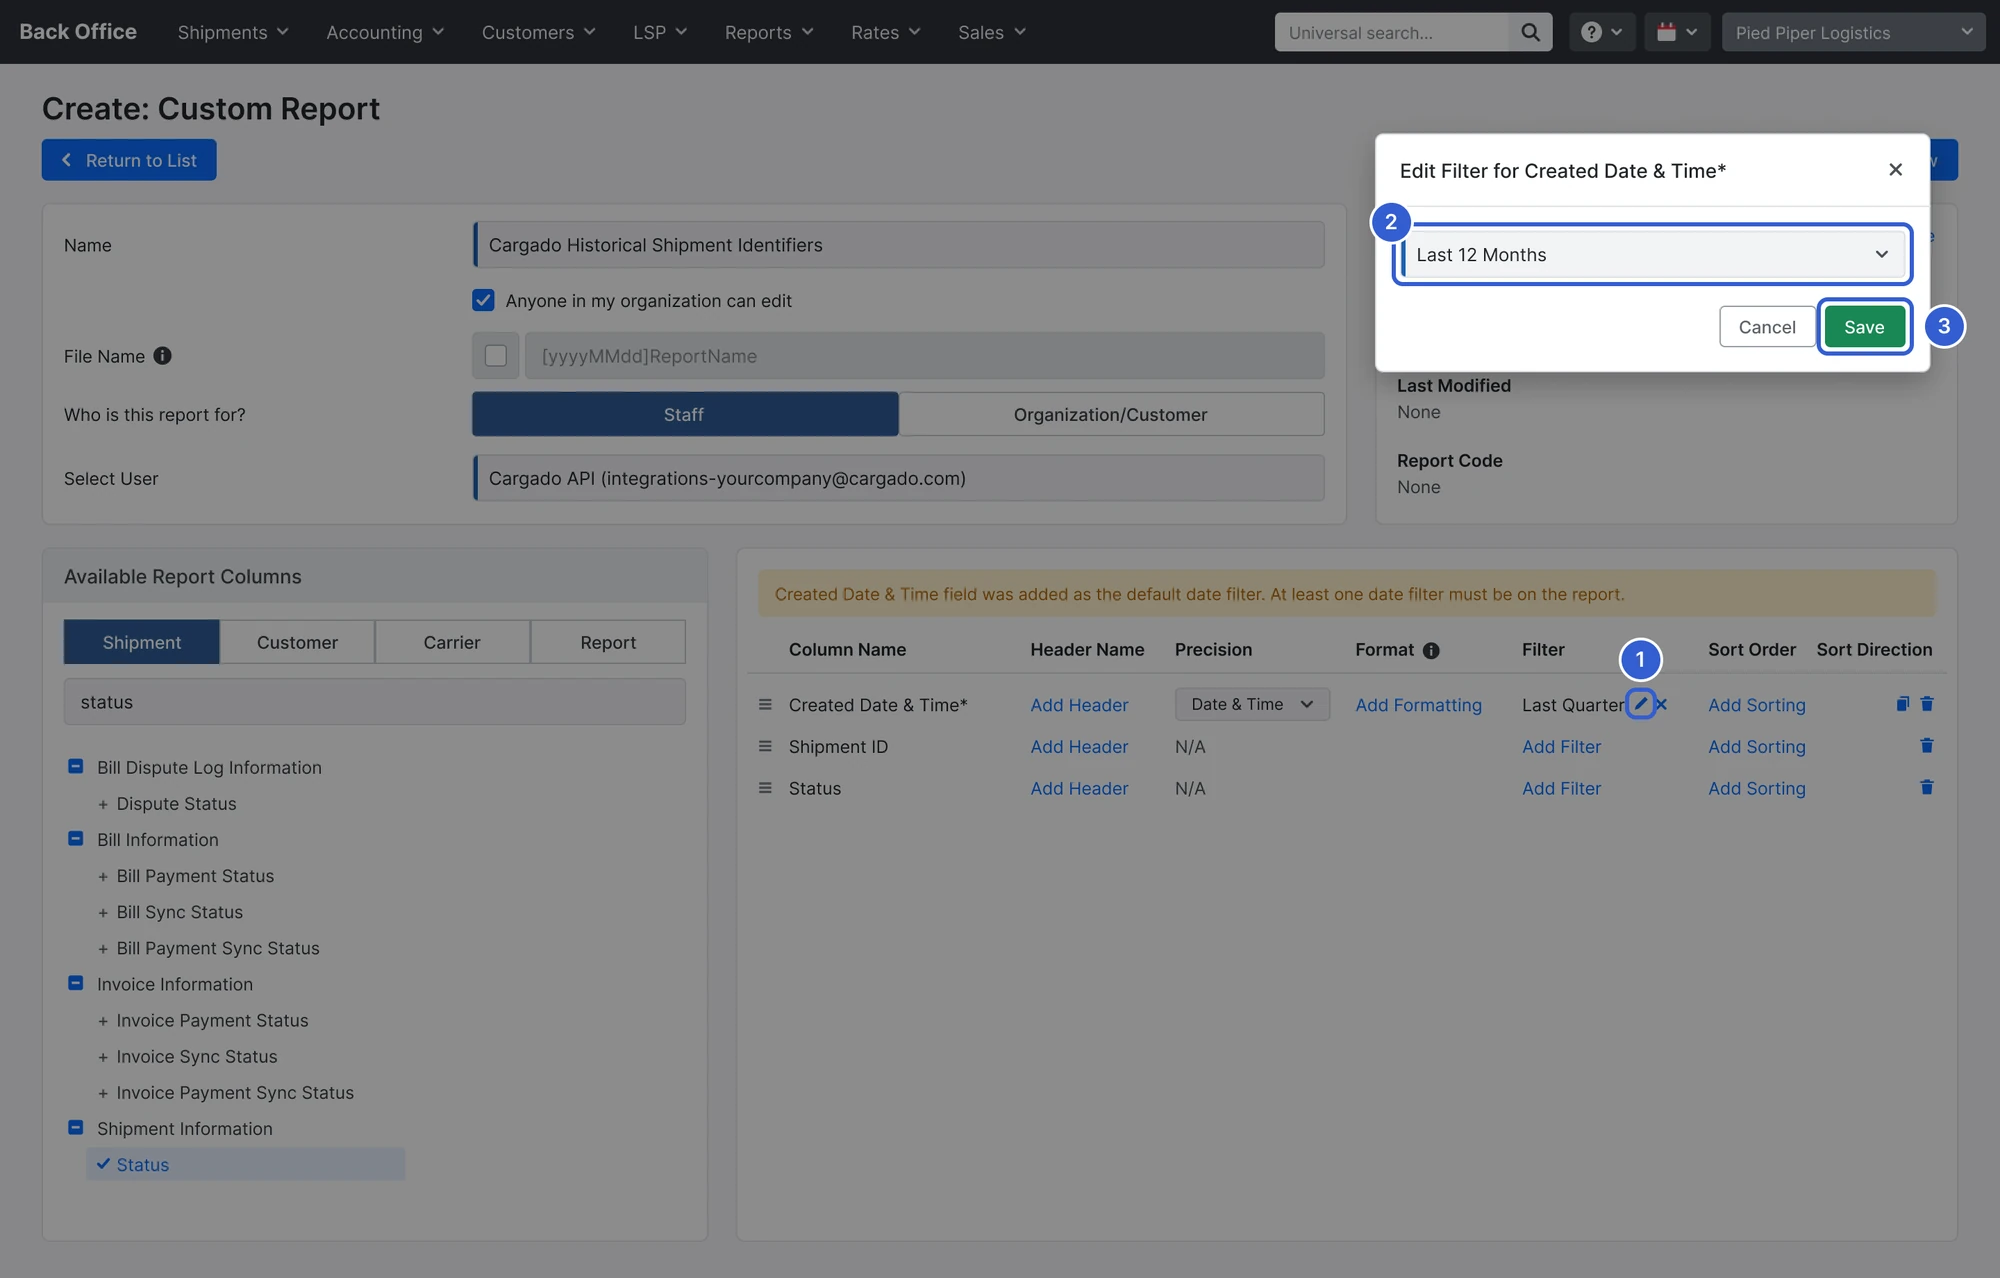
- Set the date range. On the Created Date & Time row, click the pencil icon, choose Last 12 Months, and save the filter.
- Click Save & View.
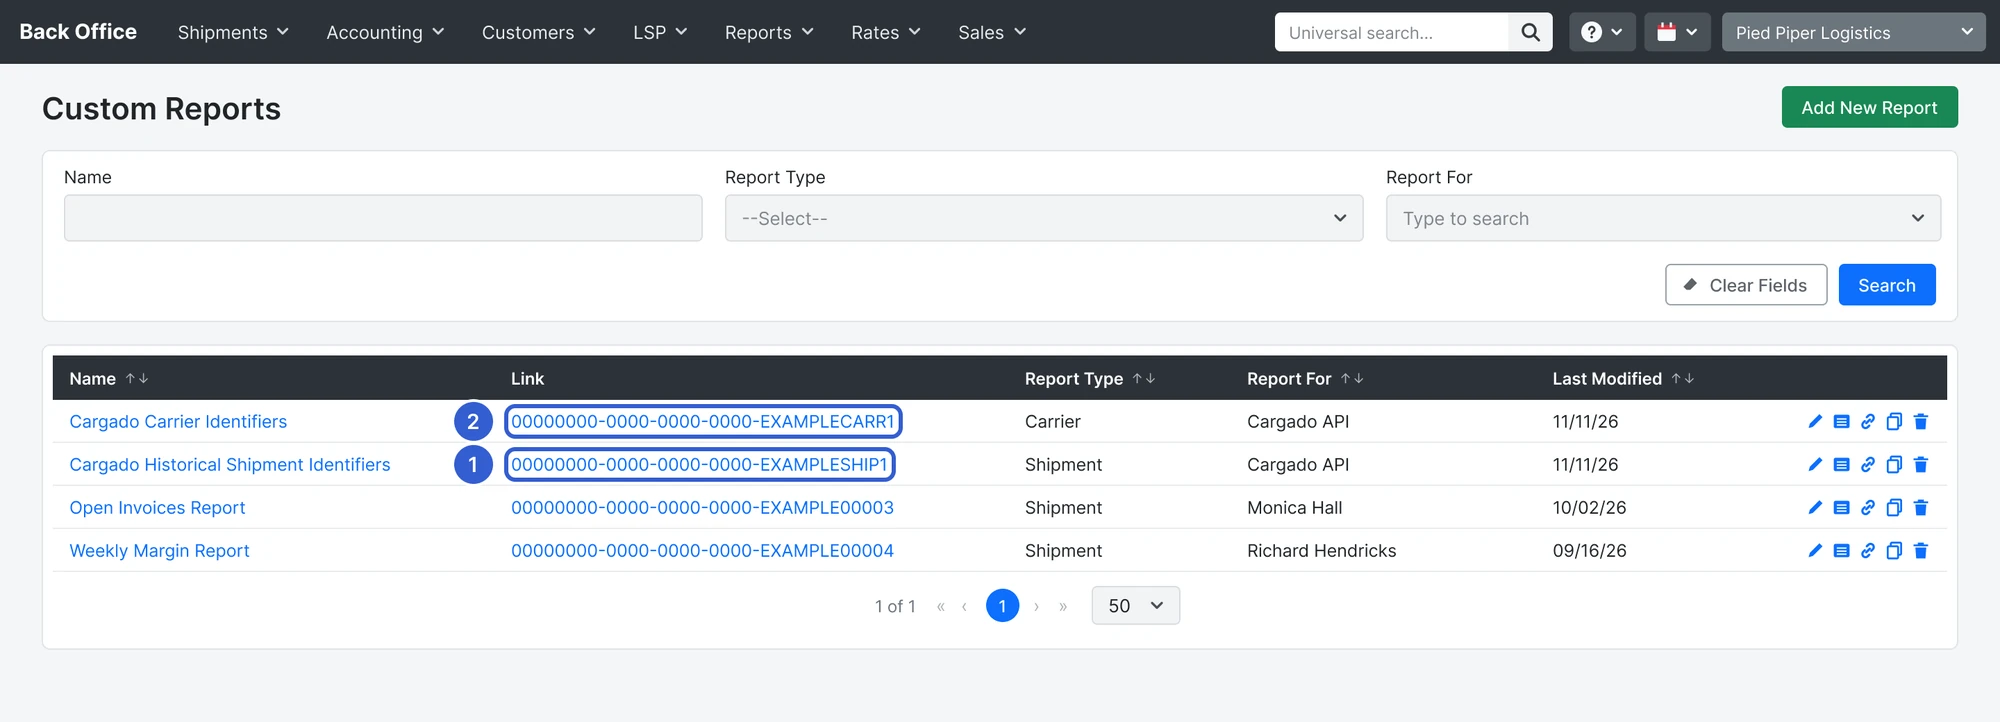
- Go back to the Custom Reports list. Copy the value in the Link column for this report. Tai calls it the Report Code. This is item 3.
Step 4: Create the carrier report
- In Reports > Manage Custom Reports, click Add New Report.
- Name:
Cargado Carrier Identifiers - Select User: choose Cargado API.
- Switch to the Carrier tab. Use the search box to add these columns:
- LSP Carrier ID (search "carrier id")
- Carrier Master ID
- Created Date (search "created")
- On the Created Date row, click the pencil icon. The filter opens on Date Range; change it to Last 12 Months and save the filter.
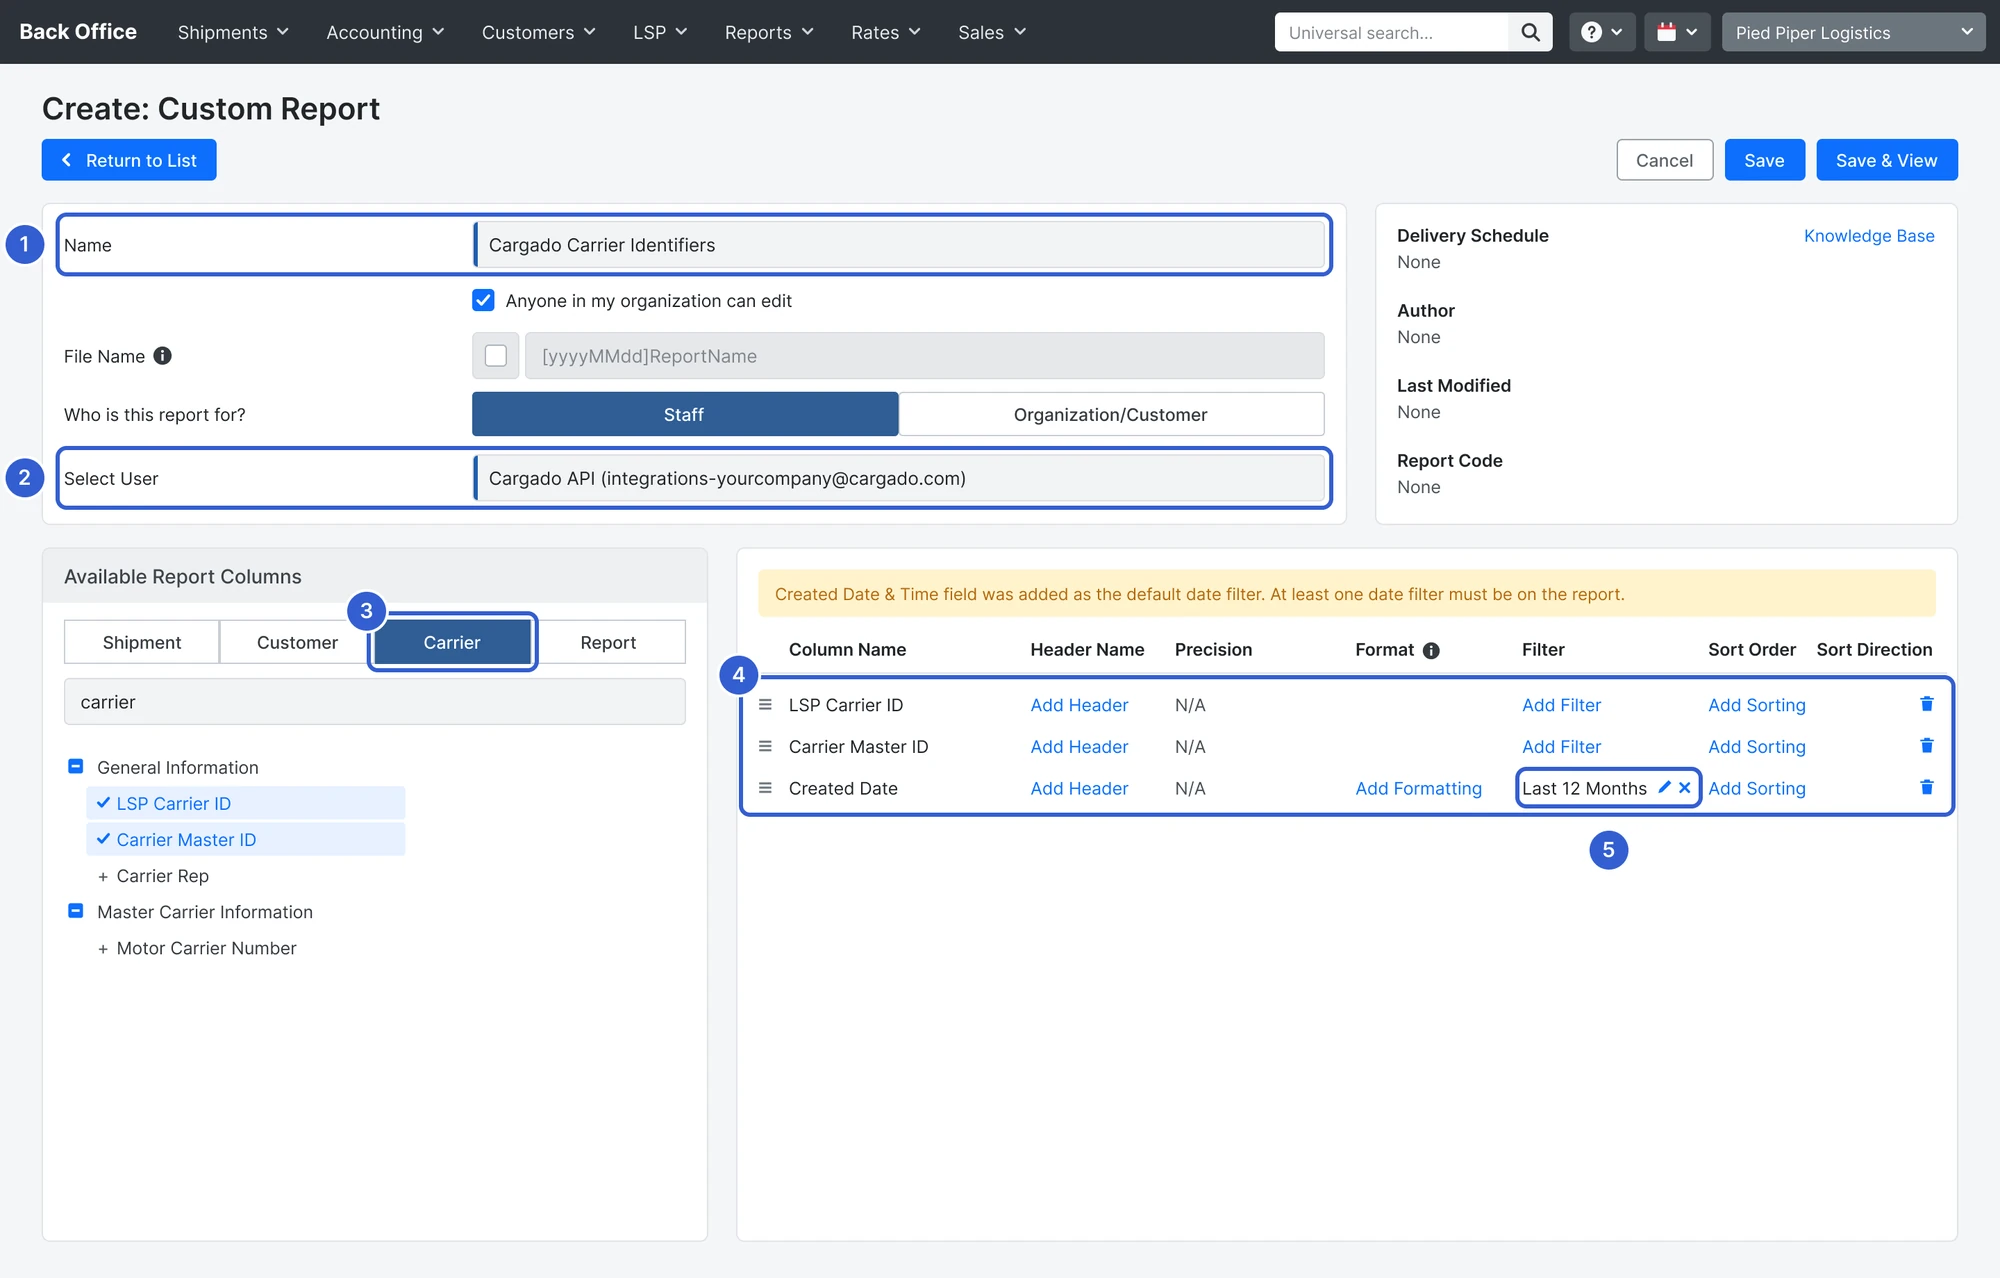
- Click Save & View.
- Go back to the Custom Reports list and copy this report's value in the Link column. This is item 4.
Step 5: Send Cargado the four items
Send your Cargado contact:
- Your Tai login URL
- The authentication key from Step 2
- The shipment report code from Step 3
- The carrier report code from Step 4
Cargado connects the integration and tells you when freight starts syncing, usually the same day.
Questions we'll ask during setup
Your Cargado contact asks four questions so loads post correctly:
- Coverage owner. Which Tai field, if any, names the person or team that owns coverage on a load. Cargado uses it to assign the coverage owner and team, with a fallback owner for loads that have none.
- Rate. Which Tai field, if any, holds the rate to post.
- Loads without a rate. Whether those loads can post as bid-only, so carriers send their price.
- Statuses. Which Tai status means a load is ready to post, and which means it's no longer available. When a load reaches that second status, its posting comes down.
What happens next
Your loads sync privately. Loads from Tai appear in Cargado, visible only to your team. Nothing reaches carriers until you post a load yourself or approve a posting rule.
Carrier sync starts. Cargado pulls in each carrier's status from Tai: approved, not yet approved, or Do Not Use. Carriers on your Do Not Use list can't see your postings.
You choose what auto-posts. Your Cargado contact asks which freight to post automatically. Most teams start with all cross-border freight (Mexico to U.S., U.S. to Canada, Canada to U.S.) plus anything picking up or delivering in a border city such as Laredo. You can turn off any lane at any time.
Bids come back to Tai. Carrier bids land on the load in Tai's offer management, where you can accept, counter or decline, and they're logged under Carrier Quotes. When you assign a carrier in Tai, Cargado sees the booking. Your team still sends the rate confirmation from Tai. Carrier chat messages stay in Cargado, and you get an email when one arrives.
Add your team. Anyone who should get bid, chat and match notifications needs a Cargado login. Posting rules can send notifications to different teams by lane.
Potential freight stays in Cargado. Quotes and potential lanes or loads that don't have a Tai load number yet are built directly in Cargado. Only freight with a Tai load number syncs.
Questions brokers ask
- Do we need a Tai sandbox? No. Most teams connect straight to their production Tai, because nothing posts until you approve it. Your Cargado contact confirms which to use.
- What if our freight is split across sub-organizations? Tell your Cargado contact which organizations hold freight you want synced, and they'll include each one.
- Can we stop auto-posting a lane later? Yes. Turn the rule off in Cargado, or ask your Cargado contact to do it.
Need help? Email success@cargado.com or message your Cargado contact.
Still stuck?
Email us and a person on our team will answer. Send the posting link or a screenshot if you have one.